Wednesday, August 14, 2013

Daring Cook's Chicken Biryani

Grace, one of our talented non-blogging Daring Kitchen members, was our Daring Cooks’ August hostess who shared with us some of her family’s tried and true Bengali Biryani recipes – all of them delicious and all of them prepared fresh from our own kitchens!

Well I have a limited supply of computer battery as well as internet connection so I'll make this short! (And I'll also be posting a photo later.)

I hope to make chicken biryani again sometime soon but didn't get around to re-doing it before the challenge time was up.

This is the 1st attempt
I definitely made it wrong--it was too sloppy and strong tasting.

But I had lots of leftovers, so after I added more rice to it, it was significantly better and very tasty!

looked and tasted much better with extra rice!
I also tried it with fresh tomatoes and scrambled eggs to make it like fried rice biryani and that was very yummy as well.

Here's what I put in it, but I'll also include the correct ingredients instructions that I will be following next time.

1 c. rice
3 c. water
1 1/2 - 2 onions
1 1/2 tomato
2 cloves garlic
1/2 tbs coconut oil and 1 tbs olive oil
8 chicken tenders
1/2 c plain yogurt
1 tbs ginger

*I was told to follow the directions on the biryani spice box ONLY if I wanted a lot of food for a lot of people!

Chicken Biryani:

Servings: 6

Ingredients

1 teaspoon whole cumin seeds
2 bay leaves
2 small cinnamon sticks
2 cardamom pods
3 tablespoons (45 ml) (1½ oz) ghee
2 onions, chopped
3 cloves of garlic, minced
1 inch (2½ cm) ginger, peeled and minced
2 teaspoons salt
1 tomato, skinned and chopped
½ teaspoon cumin
½ teaspoon coriander powder
½ teaspoon curry powder
1 tablespoon biryani powder
1 chicken, cut into 8 parts
3 cups (750 ml) (550 gm) (19½ oz) basmati rice, soaked for 30 minutes and drained
1 tablespoon (15 ml) (½ oz) (15 ml) plain yogurt
Fresh coriander, chopped
Green chillies, chopped (optional)

Directions:

1. Melt the ghee in a medium sized saucepan. Fry the cumin seeds, bay leaves, cinnamon, and cardamom in it until fragrant.
2. Add the onions, garlic, ginger, tomato, and salt. Cook on medium high heat while stirring for 5 minutes or until the onions start to brown.
3. Add the cumin, coriander powder, curry powder, and biryani powder. Cook for another 2 minutes and add the chicken. Cover the pan, and cook over medium heat for 10 minutes.
4. Add the yogurt. Cover and simmer for 2 minutes. Add coriander and chillies and remove from heat.
5. Boil the rice in 6 cups (1½ Loser of water for 5 minutes or until half cooked. Drain any remaining water. In a large saucepan, alternate layers of rice and chicken starting and ending with a layer of rice. Cover the saucepan tightly and cook over very low heat for 10 minutes or until the rice is done.


Monday, August 5, 2013

Costa Rican Tilapia with Rice and Beans

Well I don't have much to say right now except I want to praise the Lord for His provision in getting me a job which will hopefully be a great experience for me! It sounds like it will be.

And why was I so worried all those months ago about having a good job? I know He will provide. Yahweh Yireh--It's what Abraham named the mountain where God provided a ram for him to sacrifice. 

Daily He provides us with delicious food to sustain us. This Costa Rican Tilapia is just one more reason to praise Him. I will likely make this one again. (And that's saying a lot considering I rarely make things twice!)

Costa Rican Tilapia-adapted slightly from We heart food
2 tablespoons fresh lime juice
2 tablespoons olive oil
3 tablespoons finely chopped fresh cilantro
3 teaspoons minced garlic
1 teaspoons kosher salt
1/8 teaspoon sugar
4 tilapia fillets, about 5 ounces each
3/4 cup long-grain brown rice
1 cup chopped onions
3 tbs orange juice
1 can (28 ounces) diced tomatoes, undrained
1 can (15 ounces) black beans, drained, rinsed
1 teaspoon dried oregano leaves
1/2 teaspoon freshly ground black pepper
1/4 teaspoon cayenne pepper
For the tilapia marinade, combine lime juice, 2/3 tablespoon olive oil, 1 1/2 tablespoons cilantro,  3/4 teaspoon garlic, 1/3 teaspoon salt, and sugar in a shallow dish. Add tilapia and marinate 15 minutes, turning once.

To prepare the bean and rice mixture, cook the rice according to package directions and keep warm while the tilapia is marinating. Preheat oven to 400 degrees. In a large, high-sided skillet or saucepan, heat 2 tablespoons olive oil on medium heat. Add remaining garlic and onions; sauté until translucent, about 5 minutes, stirring. Add 2 tablespoons cilantro, oranges, tomatoes, beans, oregano, 1 teaspoon salt, pepper, and cayenne. Cook, uncovered, until hot, 7 to 8 minutes, stirring occasionally.

Transfer hot rice to a 9 by 13 inch or 2-1/2 to 3 quart baking dish. Spoon the bean mixture on top of rice and gently blend. Slightly overlap tilapia fillets on top and scrape marinade over fillets. Bake until the flesh of the tilapia just begins to flake at the nudge of a fork, 16 to 20 minutes. Be sure that the bottom of the tilapia is also flakey and cooked well. (this might require a messy flip of the tilapia fillets.)
This tilapia serves, and there will be rice & beans to spare--which is just what I wanted. Mmm leftovers! :) 
Notes:
-Cut the rice & beans either in half or do 2/3 of it if you're not interested in leftovers.
-If serving 6, just make a bit more marinade for two more fillets and serve with the same amount of rice mixture.


Monday, July 29, 2013

Strawberry Cookie Biscuits

I'm learning Russian these days. While browsing a Russian food blog, I happened upon this cookie/biscuit recipe, and I'm still not sure how I feel about it. The taste is GREAT. I will probably continue to experiment with this recipe, however I would definitely feel comfortable sharing a plate of these floppy biscuits with family and friends...and total strangers. They are delicious.


In the future, I may just plop the spoonfuls of dough/batter into a mini muffin tin and see how that works. They're kind of muffin-top-esque anyway. If I do that, I'll try to update this post accordingly. However, I would make these again and eat them again regardless of they're shape. Mmmm.

Strawberry Biscuits

Adapted and Translated from http://www.vsemzastol.ru 

Ingredients:
1 cup fresh strawberries, chopped
1 cup flour
1 teaspoon baking soda
1 teaspoon vinegar
1/2 cup greek yogurt
3 tablespoons unsalted butter
1/2 cup sugar
1/4 teaspoon salt
1/4 teaspoon vanilla

Preheat oven to 350F. 
Using your fingers or a pastry cutter, combine the flour and butter to make crumbs. Combine sour cream, sugar, and salt. Mix baking soda and vinegar with sour cream mixture, then add to flour mixture and stir until barely combined. Add vanilla and strawberries. Stir gently until evenly distributed.

Prepare a cookie sheet with cooking spray or parchment paper and spoon (~2 tbs per cookie) onto the sheet. Bake for 15-20 minutes or until golden brown. Remove from cookie sheet carefully and let cool slightly on cooling rack. Should make a dozen biscuits.

Note:
-I'm still unsure about the baking soda/vinegar combo. Next time I might just go with 2 teaspoons of baking soda (and omit vinegar), as the original recipe was difficult to translate at this point.

Saturday, July 27, 2013

Daring Baker's July Challenge

As humans, we are blind to the future.

I once overheard someone behind me as I was crossing the street.

"It's weird," She said. "I completely trust you and everything, but I've never crossed the street blindfolded before."

I didn't have to look back to know that a good friend of hers was likely guiding her across the street.
Isn't that how it feels sometimes when we try to follow Christ?

We know we're supposed to trust Him, but sometimes it's hard. Sometimes we wonder if there are cars coming. And we also might realize that the moment we let go of His hand and start going our own direction, we could get ourselves in some terrible or dangerous situations.

We can't see the future, so we have to listen close and hold on tight as Christ leads us into it. This isn't easy. But it must be done. If we quit following Him, we've cut ourselves off from the One who can see the future, yet we would still be blind.

Doesn't sound like a great idea to me: wondering around blind with no guide.

Even in cooking we sometimes need a guide. (Especially when we get hungry and our brains don't work as well!)

I could've used a guide for this month's Daring Baker's Challenge. We were guide-less, to an extent. It was a pick-your-own challenge from ANY previous challenge! Overwhelming.

Well I saw a few that seemed do-able but still challenging and I chose ricotta. I chose this because it would allow me to also complete another challenge: cannelloni. Well, the ricotta went really well and I highly recommend making your own.

The cannelloni, on the other hand, I would definitely not recommend making from scratch UNLESS you have a really good pasta rolling method. Please don't try it by hand--unless you have an unlimited amount of time and patience. It ended up tasting and looking wonderful by the end, but I had to throw a lot of pasta away and it caused me unnecessary stress.
This is how the "successful" pasta turned out!

Homemade pasta is delicious. Invest in a pasta roller :)

Because I didn't take a photo and it didn't go well, I won't include the cannelloni recipe here. Let's just pretend that all didn't happen. So onto the wonderful, simple, delicious ricotta...
This picture makes it look more like cottage cheese than it really did!

Homemade Ricotta Cheese

Originally From the bartolini kithcens
Total time: 30 minutes to prepare, at least 2 hours to drain.
Makes about one pound (about ½ kg) of cheese
Ingredients:
8 cups (2 litres) whole milk (homogenized)
1/2 tablespoon (7 ½ ml) (9 gm) table salt
5 tablespoons (75 ml) white distilled vinegar
Directions:
1.Combine milk, cream, and salt in a large non-reactive pot and stir over medium heat as you bring the temperature up to 85°C (185°F) (about 15-20 minutes).
2. Add the vinegar all at once and stir for 15 seconds; heat for two more minutes before removing from heat.
3.Allow to rest undisturbed for 15 – 20 minutes
4. Using a small sieve or slotted spoon, remove the floating curds and place them in a cheesecloth-lined colander to drain
5.Place colander over a bowl in refrigerator and drain for at least a couple of hours or overnight (I found 2 hours was enough). The longer you allow it to drain, the more firm the results.
6.Remove the ricotta from the colander, place in airtight containers, and refrigerate.

Note:
-don't use store bought cheesecloth. Use a real cloth--some sort of cotton napkin or towel. What's shown in the photo is what I strained it in, and it worked perfectly!

Wednesday, July 24, 2013

Individual Cheese Curd Strata

We can be so slow to react to God's prompting. I'm pretty sure this is what it means in 1 Thessalonians 5:19. When we know what we ought to do, the Spirit is trying to drop hints all over the place, but we continue on as if we were following our own will. Following our own will is not the Christian's aim. Following our own will basically goes against everything Christ commanded. Yet we do it daily.

Picture the Spirit as a fire. One day, a fire is lit. At first, of course, you are more than excited about the fire. This is what happens when you're cold and alone and just want some warmth in your life. So finally, God sparked a flame and a fire came to you. This fire is tended to well at first. You give it utmost attention and are completely willing to forget many other things of the world in order to keep this fire from burning out. But there will come a time when you get distracted, after a while, and you will stray from tending the fire. It's ok, because the fire kind of keeps burning on its own (after all, there's only so much control you have over such a powerful essence). Then the distraction turns to more. It becomes your sole focus, your goal. It becomes what you want to invest in, rather than the fire. Although instead of just leaving the fire, you begin to feel that it would be a distraction from your new pursuits. So you toss water on it. You're beyond ignoring it, you'd like it to stay out of your mind, out of your way. So you put it out.

This is how you quench a fire. You pursue other things, you let it die, you toss water on it, or spread it out, because it is annoying you that it demands so much of your attention.

This ought not happen with the Spirit. The Spirit, our God should consume our lives. Let His fire roar in your heart, and follow His prompting until your heart is a wildfire that cannot be put out.

And now, an unrelated recipe.

Praise the Lord for delicious food combinations. This is one of those. Put cheese curds in breakfast strata. Do it. God made it good!

Cheese Curd Strata for One

Ingredients:
1 (fairly small) slice of dry sourdough bread
1 egg
1/4 c almond milk
1 tbs greek yogurt
handful of spinach
1 tbs chopped green onions
1 inch long cheese curd (~ 1 tbs?)
pinch of pepper
salt to taste

Layer all dry ingredients in a small (about 2 cup) oven-safe dish that has been lightly greased. Beat egg, milk, yogurt, salt, and pepper together in a separate bowl, then pour on top of dry ingredients. Leave overnight. In the morning, preheat oven to 350 degrees. When the oven is up to temperature, cook for about 30 minutes, making sure it doesn't giggle too much before taking it out. Let it cool for at least 5 minutes before eating.

Sunday, July 21, 2013

Swiss Mushroom Oatmeal

I just took a wonderful trip to Wisconsin with my mother. It was good.

We went to the zoo (yes we're children at heart) and we ate a lot of good food.
Fav. animals at the zoo: beautiful lions. The King and Queen!

We checked out some delicious Madison restaurants, which I would recommend. One of those is Fraboni's deli. If you want a quick, inexpensive and delicious sandwich with lots of meat, this is the place in Madison.

I also recommend Michael's Frozen Custard (also in Madison), and I don't recommend much topping. I got strawberry banana on vanilla custard, and the custard was SO good that I just wanted to skip it and go straight for the good stuff. So I would maybe just recommend one or no topping. No need to get fancy--but I'm a big fan of simple vanilla anyway (which is odd considering all the other strange things I eat). Unfortunately this nice little treat gave us a nice taste of something that we don't need to be craving all the time. Thankfully we have a few Culver's restaurants nearby and we might be giving them a little bit more business after this nice little trip to the frozen-custard-loving state.

We also spent the night in Wausau, which was a much more happening place than we expected it to be. While in Wausau, we woke up to a not-so-appitizing "hot" breakfast at our hotel, consisting of bread, waffles, coffee, 2 cereal choices, a big pot of oatmeal, and some pre-made fake-looking cheese omlettes. It sounds better than it looks. We decided to venture out for breakfast to a great little diner called Mint Cafe that has been around for a while. There we had some very real-looking omelettes and gobbled them down (I had a pesto tomato feta one and my mom had something with spinach and artichokes). It wasn't too much food--the prices were pretty low so we got what we paid for in our opinion.

All in all, a good trip.

But all this Wisconsin stuff and I don't  even mention CHEESE. Which, of course, I knew I needed to get before returning home. Well, guess what? We ended up buying about 7 lb. of cheese. And so far, so good. I recommend Mullins for a cheese factory store near the Wausau area.

Speaking of cheese, I've got a recipe for some oatmeal that would be great with some delicious Wisconsin swiss cheese (or nearly any other kind of cheese I'm sure). Mmm. Here's the savory recipe:

Swiss Mushroom Oatmeal

Makes 1 big serving or two side servings (would go well with eggs of some sort!)
Ingredients:
1/2 c old fashioned oats
1 c. water
2-3 baby portebella mushrooms, sliced
1 1/2 tbs chopped onion
1/4 tsp minced garlic
1/8 tsp basil
1/8 tsp oregano
1/8 tsp thyme
1/4 tsp worcestershire sauce
salt to taste
1 slice of swiss cheese


Combine worcestershire, water, oats, and herbs and let soak for at least 10 minutes. Cook the mushrooms, onion and garlic in a small skillet (might want some olive oil in there first). When they become limp take them off the heat. Then cook oatmeal in microwave for about a minute. Add mushrooms onions and garlic to the oatmeal and cook for another minute or two. When the oatmeal appears to be done, top it with swiss cheese and stir. Then let set for a few minutes (no burnt tongues!!) and enjoy.

Notes:
-The longer the oatmeal is soaked, the less it needs to be cooked. 
-This might be good if you pour the oatmeal into an oven-safe dish before topping it with cheese, then popping it in the broiler for a bit to get a nice cooked cheese effect! 
-This idea came from this recipe for "oat burgers" from food.com! I've never tried the burgers though--let me know if you have!

Monday, July 15, 2013

Yogurt Sauce for Tuna Burger


So as far as this recipe goes...I wrote it down without many measurements. I apologize. This is fairly embarrassing. The thing is, I said I would post this in the Tuna Burger post. So here it is. (Oh this is also technically an addition to the Daring Cook's yogurt challenge.)

No new photo either:

Herb Yogurt Sauce 

Ingredients for one serving:
1/8 c homemade yogurt (ok, store-bought works too)
fresh thyme
fresh oregano
some worcester sauce
some mustard
3/4 tsp honey
salt & pepper


Mix everything together. My note said that I added more worcester sauce then mustard, so that may be helpful. I remember it being delicious. Just keep tasting it until it's satisfactory and smear it on a tuna burger. Nothin' fancy!
:) Enjoy!

Sunday, July 14, 2013

Daring Cook's June Challenge: Yogurt

Yogurt is not one of those things that I've really desired to make "home-made"

It sounds...almost unnecessary. I've felt the same way with cheese. I know it's probably cheaper and just all-in-all better, but it's scary, foreign territory to me. Working with bacteria and the like just didn't seem to be my forte.

I'm still not 100% convinced that the effort is worth the outcome. I'm sure with a little practice, the effort would become less...intense. So I've decided that I'll likely try it again.

Because I get it. We're all control freaks a little bit and we want to put what we want in our yogurt and nothing else and we want it to be just the right amount of tangy, or runny, or whatever it is. I get it. We like control. So we make our own yogurt!

Well, maybe I need to take a deep breath and be ok when the yogurt bacteria start doing what they want and don't ask me what I want. So my yogurt turned out...not very tangy...and a little bit runny...and different than what I wanted.

But hey, I did it for the experience, not the control....right?? Maybe.

After I got over my slight disappointment, I started actually enjoying the yogurt (maybe I don't even know what's best!).

I'll be honest, I'm sad, because I ate it all. And I'm scared to make it again because I don't want the whole process to flop!

I need to let it go. Stop fearing failure, and cook me up another batch of this homemade yogurt. Because I've decided...it's good, and I'd gladly have some more hanging around in the fridge.


This excellent challenge came from Cher at http://crazyworldofcher.blogspot.com

Traditional Milk Yogurt

Servings: 4-6 servings
Adapted from “Cuisine at Home” June 2011

Ingredients
One quart (4 cups) (1 litre)whole milk
¼ cup (60 ml) (18 gm) (2/3 oz) non-fat dry (powdered) milk (optional, but recommended) (may substitute other thickening agent as noted above)
Sweetener (optional – 1 tablespoon (15 ml) of agave nectar, honey or sugar)
¼ cup (60 ml)(60 gm) (2 oz) plain yogurt or 1 packet of yogurt starter or other starter
Directions:
1. In the bowl of a double boiler* (or in a microwave-safe bowl), stir together the milk, powdered milk and sweetener (if using).
2. Place the bowl over the simmering water (medium heat) and heat until the mixture reaches 185°F/85°C. Be sure to stir frequently during this time. You can also opt to microwave the mixture until it reaches the desired temperature, but I have found that the double boiler method seems to produce the best results for me when making a milk-based yogurt.
3. While your milk is heating, prepare an ice bath. (I place ~4 cups of ice and 2-4 cups of water in a large bowl – the goal is to cool down the heated mixture as quickly as possible).
4. Once the mixture reaches 185°F/85°C, remove the bowl from heat and place in the ice bath. Stir constantly until the temperature of the liquid drops to ~115°F/46°C.
5. When the liquid cools to 110°F/43°C, stir in the starter. (If you are using a freeze-dried culture or pro-biotic capsules, make sure the liquid has cooled to the temperature recommended for that particular culture).
6. Ladle the yogurt mixture into ½ pint (235 ml) glass jars (should be ~5-6 jars depending on how full you fill them), secure the cover and place into your incubator. (If you are using a large glass bowl or some other vessel, cover the bowl securely with plastic wrap and proceed as below).
7. Incubate the yogurt for about 5-10 hours. Longer incubating times will result in a tangier yogurt. The optimal incubating temperature is ~122°F/50°C for yogurt starters (if you are using a freeze-dried starter or pro-biotic capsules, follow the recommended temperatures for those starters). Ideally, you want to keep the temperature as close to that as possible for the incubating period. Realizing that may not be possible – I try to target keeping the mixture between 115°F and 125°F (46°C to 51°C).
8. Once the yogurt is done incubating, carefully transfer the containers to the refrigerator and chill for at least 8 hours. This step helps to thicken the yogurt and lulls those ravenous friendly bacteria back to their sluggish state.
9. After the cooling period, the yogurt is ready to be enjoyed.
*If you do not have a double boiler, you can use a large heat safe (i.e. glass or metal) bowl that will nestle on top of a pan of simmering water. You don’t want the bottom of the bowl to touch the water.More detailed instructions can be found here.


Monday, July 8, 2013

Overnight Lasagna Oats

I'm a pretty prideful person. It's a terrible thing. My pride invades every aspect of my life. My conversations, my attitude, my relationships, and even my cooking. So sometimes I think I'm an such an awesome cook and whatever I make will turn out just how I want it to. But I pretty sure that's the case for anyone...getting it right every single time?

I mean, God has really blessed me with a lot of small talents. I'm no rockstar at any one thing, but He's given me the ability to be pretty good at many different things. (Often, I think I'd rather be really great at one thing and be terrible at everything else, but that would probably not be awesome all the time either.)

So I need to be grateful for what I've been given, while not getting cocky about it. Life is a balance. On our own, all we can do is swing back and forth between two bad lifestyles.

For example: cocky or insecure. And sometimes we manage to be both cocky and insecure! It's crazy what terrible things we can come up with on our own. Thankfully, Jesus can help us balance. With Him, at least once and a while (or hopefully more often) I can be humble and grateful. And that's something I'm thankful for!

I don't post my mistakes...most of the time. I mean, sometimes I do cook something that is super tasty.

This one may sound like it, but no--this one was NOT a failure. It was deliciousness. In a bowl.


Overnight Lasagna Oats

For one serving:
1/2 cup old-fashioned oats
milk/water (enough to cover the oats)
baby spinach
1-2 tbs ricotta
2-3 tbs pasta/marinara sauce
pepper
sprinkle of parmesan 
*optional: basil, precooked chicken or beef, or whatever else you put in your lasagna!

Some of these ingredients don't have amounts. It's basically up to what sounds good to you. I layered all of these things in the order that they are listed into a microwave dish and then left it in the fridge overnight. You could have it cold the next day (if you're into the cold lasagna flavor) or you could warm it up in the microwave for about a minute, like I did!

Note:
I didn't stir it together at allso it maintained a more lasagna-like feel, but I'm sure it'd be good mixed up too--and it would probably cook more evenly.

Friday, July 5, 2013

White Chocolate Raspberry Pasta

Well I didn't mean to make homemade pasta. Originally I was trying to make...something else. But alas, it turned out pasta-like and I had some scraps and decided to boil them up.

It turned out pretty good! Accidental outcomes are fun.


So this pasta is...REALLY basic. Like, so easy, so simple. If you have access to flour and water, you can make it. So, that's a plus. Of course, that makes it less exciting (taste-wise). Except that it's homemade pasta. And maybe you're really not in the mood to go to the grocery store today (or you've already been a couple times!) and you just really want pasta. No fear, this pasta is ready in about 40 minutes. Most of that isn't even hard work.

It may not be necessary to take every step I did, because I was making the dough for something else. But I'm going to describe it how I did it.

This would serve 1 as a main dish, and perhaps 2 as a side (or a dessert as I made it)

White Chocolate Raspberry Pasta

Pasta:
1/3 c. flour
2-3 tbs of water
*optional: pinch of salt

Topping:
white chocolate chips (avoid the trans-fatty ones! I like Ghirardelli)
raspberries, fresh or frozen (thawed if frozen)

Combine flour and water until it forms a dough. Then cover with plastic wrap and let rest for 20-30 minutes.

Bring water to a boil in a medium saucepan.

After dough has rested, roll dough on a floured surface. It should be really thin in order for it to cook quickly!! There are lots of methods for cutting it, but I just sliced it with a nice big knife. (I've seen some fancy folding methods which look nice, but I didn't care if mine was a consistent size.)

Then throw the pasta in the boiling water and watch in fascination if you've never made homemade pasta before. Cook for about 5 minutes (or just taste-test them periodically as I did).

Strain pasta and top with white chocolate chips and raspberries. Enjoy!

Tuesday, July 2, 2013

Cookies and Cream Barley Pudding

I just wanted simple vanilla barley pudding. That's how it started.

I wanted to use up the barley I had cooked the day before. 

So I made some pudding. But it wasn't my intention to throw an "oreo" cookie into the mix. It just kind of...jumped in there when the vanilla didn't quite give it the flavor I was going for. So here it is: 

Uninvited, but certainly not unwelcome.

Cookies and Cream Barley Pudding

Ingredients for 1 serving:
1/2 c. cooked barley
~1/3 c. almond milk (enough to cover barley)
2 tbs cornstarch
1/4 tsp coconut oil
1/4 tsp vanilla
1 crumbled oreo-type cookie (or 2!)

Combine barley and milk in a saucepan and heat thoroughly. Once it is warm, stir in cornstarch and coconut oil. Let simmer/cook until it reaches desired thickness (I simmered it for about 10 minutes). Once at desired thickness, remove from heat and add vanilla and crushed cookie pieces. Let it set for 5 minutes then serve it up or chill it to enjoy it cold!


Sunday, June 30, 2013

Carrot Cake Scrambled Eggs

Do you know what American churches don't do enough in my opinion?

DANCE.

The kiddos get to dance. Why don't the adults dance too?

I was a counselor for my church's kid's camp and had a BLAST dancing to music which praised Jesus. It's incredibly natural. David danced. And it's in many of our contemporary worship music lyrics (which we often sing with stoic stances and expressionless faces on Sunday mornings).

I don't have much more to say about that :) So...dance for Jesus!

So I'm becoming a big fan of these "sweet scrambled eggs". Nothing like having your favorite desserts inspire a healthy breakfast. Delicious! This time, carrot cake was my inspiration. And I was quite pleased with the outcome.


Carrot Cake Scrambled Eggs

for one serving:
1 carrot, shredded
1 egg
1/4-1/2 banana (mashedish)
pinch cinnamon
1/8 tsp vanilla
1/8 c almonds (or walnuts, pecans, etc.)

Chop/blend the carrot and almonds significantly (I put this in a mini-food chopper, but it's not necessary). Then combine all ingredients (except frosting ingredients) and whisk together. Scramble as you would any eggs!

"frosting":
1/8 c greek yogurt (plain whole milk)
1 tsp brown sugar
vanilla

Stir together frosting ingredients and spoon onto warm eggs. Enjoy!

Thursday, June 27, 2013

Daring Baker's June Challenge: Pie

Rachael from pizzarossa hosted this month's Daring Baker's Challenge (my first challenge!) and gave us an excellent assortment of pies to pick from and bake. I'm not sure why I did it, but I believe I chose the most unhealthy option. Silly me. 

This crack pie (from Momofuku Milk Bar) is a dangerous thing. I believe this one was stretched...pretty thin. I mean, it provided PLENTY of servings.

The truth is, it was addicting and delicious. But there was something about it that didn't call me back for more as much as other desserts do.

I'm not sure I'll make it again.

However, if you're looking for a fun new pie to try and you love the idea of pecan pie but you lack pecans or are allergic to nuts, I think this could be the pie for you.

Don't get me wrong, it's great. So tasty. But for me, the unhealthy factor was a bit too overwhelming.

It was a lot of effort to not change a single thing, but I followed the recipe precisely. Someday perhaps I'll try a healthier version. We'll see!

It is fun to make. I'm very excited to be posting my first Daring Kitchen Challenge.

Next time, if there's options, I'll try to pick the healthy one so I can enjoy it more!

Crack pie

Servings:12
Preparation time: 20 + 20 minutes
Baking time: 18 + 50 minutes
Cooling time: 1 hour + 2 hours, approx.
Chilling time: overnight
Ingredients
Oat Cookie Crust
9 tablespoons (1 stick + 1 tbsp) (135 ml) (4½ oz) (125g) unsalted butter, room temperature, divided (6 & 3 tbsp; 85gm & 40gm)
5 1/2 tablespoons (85 ml)(2½ oz) (70 gm) (packed) light brown sugar, divided (4 & 1½ tbsp; 50 gm & 20 gm)
2 tablespoons (30 ml) (30 gm) (1 oz) white sugar
1 large egg
3/4 cup plus 2 tablespoons (210 ml) (80 gm) (2¾ oz) old-fashioned oats
1/2 cup (120 ml) (2½ oz) (70 gm) all-purpose flour
1/8 teaspoon (2/3 gm) baking powder
1/8 teaspoon (2/3 gm) baking soda
1/4 teaspoon (1½ gm) salt
Filling
3/4 cup (160 ml) (170 gm) (6 oz) white sugar
1/2 cup (packed) (120 ml) (100 gm) (3½ oz) light brown sugar
1 tablespoon (15 ml) (8 gm) (¼ oz) dry milk powder
1/4 teaspoon (1½ gm) salt
1/2 cup (1 stick) (120mlk) (4 oz) (115gm) unsalted butter, melted, cooled slightly
6 1/2 tablespoons (100ml) heavy whipping cream
4 large egg yolks
1 teaspoon vanilla extract
Powdered sugar for dusting
Directions:
Oat Cookie Crust
1. Position rack in center of oven and preheat to moderate 350°F/180°C/gas mark 4. Line a 13x9x2 inch/33x22x5cm metal baking pan with parchment (baking) paper. Lightly spray or butter a 9 inch/22cm diameter glass or ceramic pie dish.
2. Combine 6 tablespoons (85 gm) of the softened butter, 4 tablespoons (50 gm) of the brown sugar and the white sugar in medium bowl. Using an electric mixer, beat until light and fluffy, about 2 minutes.
3. Add egg and beat until pale and fluffy, about 1 minute.
4. Add oats, flour, baking powder, baking soda, and salt and beat until well blended, about 1 minute.
5. Dump oat mixture into prepared baking pan and press out evenly to edges of pan.
6. Bake until light golden, 18 minutes. Transfer baking pan to wire rack and cool cookie completely, about an hour.
7. Using your fingertips, crumble the cookie a into large bowl - there should be no identifiable pieces of cookie remaining. Add the remaining 3 tablespoons (45 gm) butter and 1-1/2 tablespoons (20 gm) brown sugar. Rub in with your fingertips until the mixture is moist and sticks together when pressed between your fingers.
8. Transfer cookie crust mixture to pie dish. Using your fingers, press mixture evenly onto bottom and up sides of pie dish (about 1 inch/2.5cm up the sides if your pie dish is deep). If your pie dish is shallow, place it on a baking sheet in case of overflow.
Filling
1. Position rack in center of oven and preheat to moderate 350°F/180°C/gas mark 4. If possible, use bottom-only heat, or the filling may brown too quickly.
2. Whisk both sugars, milk powder, and salt together in a medium bowl.
3. Add melted butter and whisk until blended.
4. Add cream, then egg yolks and vanilla and whisk until well blended.
5. Pour filling into crust.
6. Bake 30 minutes (filling may begin to bubble up). Reduce oven temperature to 325°F/160°C/gas mark 3. Continue to bake until filling is brown on top and set around edges but center still jiggles slightly, about 20 minutes longer.
7. Cool pie completely in pie dish on wire rack. Chill uncovered overnight.
8. Sift powdered sugar lightly over top of pie. Cut pie into thin wedges and serve cold.


Saturday, June 22, 2013

Tuna Burger and Dreams

I don't believe anything happens without a reason.

It's actually a pretty big thing to believe. That means when I stub my toe, it happened for a reason. That means that when I see someone biking on the side of the road, there's a reason I noticed them. I don't believe in coincidence.

So this means there's a couple of things that I take more seriously than the average person.

One of those things is dreams. Because I don't believe they are random neural bursts.

I'm not saying that every single time I have a dream I think it's some sort of a sign or prophecy.

Ha, if that were true, I'd be married to at least 4 different guys (probably more) and have a couple kids. If that were true, at some point in my future, I will get chased by a black spider the size of a compact-car. Just think about if it was true of your dreams!

But if I have a dream and I remember it, there's a reason. It means something about it is important, whether it's important because it is bothering or worrying me or if it is actually a warning or sign of what might happen in the future.

To a certain extent, we are in control of our dreams.

If we do something wrong in our dreams, then, what does it mean? Does it mean we are at fault? Well, it won't hurt anyone. Except you.

A little over a year ago, I gave up sweets for Lent (I'm actually not Catholic; this is the only time I have given something up for Lent).

It was kind of a big deal. I didn't realize how much I idolized food until I tried to stop eating sweets. And I did give them up successfully. Sort of. I followed the rules that I made for myself all 40 days. It was the nights that I struggled. In my sleep.

I woke up one morning during Lent so upset because in my dream, I had caved in and eaten a couple M&M's. Big deal? Not really. But I felt unbearably guilty.

It happened two more times. The next time was pie or cheesecake or something much better than M&M's, but I woke up feeling the same: so concerned that I'd messed up.

First, this shows that I can be a bit of a legalist. I set these no-sweets rules for myself and if I had "broken them", it really would not have mattered. But of course, it would've mattered immensely to me. I would've drowned myself in guilt, and yada-yada-yada. Not the point.

Most importantly, this showed that I was still idolizing food. Dreaming about eating cheesecake? I mean it's good, but...come on. God's better, right? RIGHT? Sometimes I'm pretty sure I don't believe that He is.

Idolatry--it's sickness.

Dreams like this also happen when I'm trying not to idolize guys. I can get really hung up on a guy and dream about him fairly often.

I used to think I didn't have control over my dreams, so I didn't have to worry about all of the emotional lust that was involved in them. I've dated SO MANY guys in my dreams. And I used to tell myself that was ok.

No, if I was married, that would be a bad thing. If I was a wife, I wouldn't want my husband to wake up every morning having dreamed about some other woman. That'd be...sad.

Why would I be "off the hook" for lusting, as long as I was doing it while I was sleeping? That doesn't make sense. I mean, at times dreams feel so real, I might as well be awake.

I believe dreams can sometimes reveal the dirt in our hearts. The dirt that doesn't seem all that filthy when we try to cover it up. The kind that we really enjoy secretly, but we know we should not allow our awake minds to focus on. Then we have a nice little lustful dream and giggle to our friends, convincing ourselves that we can't control it.

Sometimes these dreams stay with me all day long. 

Honestly, who wants to dream about someone else's boyfriend/husband one night and then not stop thinking about him all day long because you keep remembering what it felt like when he held you like he did in your dream? That's sick.

Our dreams are our own responsibility. They happen for a reason.

Does all that talking about dreams make you want to make some tuna burgers?

I thought so. Well I've got a recipe for you.


One Serving Tuna Burger

This recipe is adapted from http://www.canyoustayfordinner.com/2011/03/25/lemon-garlic-tuna-burgers/ (I suggest using her recipe if you want to make it for 4 servings!)

Ingredients:
2 oz canned tuna
1/8 c panko breadcrumbs
1 1/2 tbs chopped, sautéed white onion
2 tsp fresh parsley
small clove of garlic, minced
~1 tsp lemon juice
2 heaping tsp sour cream
1 tbs egg (or egg substitute)
salt & pepper

Combine all ingredients to make a patty.

Let set for 5-10 minutes.

I cooked mine in a skillet with a lid for about 10 minutes (5 on each side) on medium heat. The inside probably could've been a bit more done so make sure the skillet isn't too hot. Make sure you let it set for 10 minutes before cooking on a skillet, and warm up the patty along with the skillet (i.e. don't "preheat" skillet).

If you want to turn on the oven for this (I recommend this method if you're making the recipe for more than 1 serving), preheat to 400 and bake for about 20 minutes.

Recipe for the sauce will come later. (It will be a while, don't hold your breath.)

Tuesday, June 18, 2013

Garlic Basil Changua (Egg & Milk Soup)

So I've heard that in foreign countries, hot food and soup are served just as often on hot days and cold days. Apparently it has something to do with the body's temperature regulation.

What do I know? I tend to crave a smoothie and cold cut sandwich when it's 90+ degrees out. As far as I know, my body temperature is still 98.6 ;)

But then again, there's something about steaming hot food that just satisfies, no matter what the temperature.

Today, as the temperatures are rising, I decided soup would be a good option.

I chose a breakfast soup. From Columbia I believe. I have to admit, I have a really hard time following a recipe. So yes, I changed a few things up. Partly because I wanted to use what I had in the cupboards! Also, I wanted to experiment. I think it's worth a try. It's pretty tasty if I may say so myself.

Mine looks thin and funny. This is because I didn't add enough milk, and I used skim milk. The recipe given has been improved. It will look/taste better if made according to the recipe below!


Garlic Basil Changua

Ingredients for one serving:
1 cup of milk (2% or whole would be best)
1 cup of water
1 clove of garlic (use a garlic press if possible or just mince)
1 teaspoon onion powder
1 egg
salt and pepper to taste (don't be shy on the salt--most of us are used to salty soup)
2 basil leaves, chopped
1 tsp parmesan cheese
1/4 cup chopped tomato

Heat milk and water, then add garlic and salt. Simmer approximately 10 minutes. Add tomato and onion powder, then carefully add egg (don't break the yoke!).
When the egg is done, pour into bowl and top with remaining ingredients: pepper, basil, and parmesan.
Enjoy with toast or croutons!

Note:
-I was very tempted to get even farther from the original "changua" concept and scramble the egg to make it egg-drop milk soup. This would be a good thing, since I felt I had to eat the soup and egg separately. I wanted egg in every bite. Next time I make this, I will probably try egg-drop style.

Monday, June 17, 2013

Cookies and Cream Scones with Mint Glaze

My sister's birthday was last week. To celebrate, I wanted to bake her something!

She has always loved cookies and cream ice cream. But recently she's been into mint cookies and cream ice cream (I think it's Beyer's Grasshopper Pie or something to that effect).

So I thought I'd make her some scones inspired by her favorite ice cream flavor!


So I'm not going to post the recipe for the scones. Because you can find it here: http://bakingbites.com/2010/08/cookies-n-cream-scones/

The only thing I changed was that I subbed some of the white flour for whole wheat flour, and they turned out great!

I also added glaze on top. It's not necessary for tasty scones, but it was delightful this way.

Mint Glaze

Ingredients:
1-2 tbs milk
powdered sugar
peppermint extract

optional-green food color (see note)

So I just make glaze by stirring together powdered sugar and milk until I feel it's at the consistency that I want it. Just as a reminder, a little milk goes a long way when making frosting! Also, it does not need much peppermint extract. I think I used about 1/8 of a teaspoon or less. It can be very strong, but it really depends on how much glaze you're making. Just taste it after adding a little and see if it needs more!

Notes:
- I attempted giving my frosting a slightly green tint by soaking spinach in the milk I was using. The frosting did have a tint of it, but you couldn't tell once it was on the scone. Anyway, it shouldn't take much food coloring, and I think next time I would try harder to make the spinach work--adding more or something!
-What's shown is a 1/2 recipe and I cut it into 6ths, but I believe the recipe called for 4ths. These were plenty big for a normal size--definitely not "mini" scones.

Sunday, June 16, 2013

Blue-green Scrambled Eggs

I was listening to some "Christian" radio yesterday. I do most days. I'm not one of those people who thinks "Christian music" is the only music that should be listened to. (I'm even putting quotes around it, because the word Christian shouldn't be an adjective, in my opinion, it should be a noun, a person!)

But some of those songs have great lyrics. They are lyrics which really are worshiping the one true God for all that He does, has done, and will do. Not all of the songs, but a good amount of them.

I'm not sure what's worse though: singing along mindlessly to a song which praises and worships the King of Kings, or singing along mindlessly with a song which blatantly puts people down and includes degrading lies. Either way, you might be completely checked out.

Perhaps there is not a "worse" in this situation. Like most things, it might be two wrong areas that we don't want to be in. One side of the spectrum is a bad idea, and the other side is also bad!

It would be good to try to be somewhere...in the middle. Listening to either, but making sure that I don't sing along unless I mean it, and making sure that if I mean it, it is good stuff to be saying.

Hopefully that made sense.

Again...no transition...


Blue green is actually a main color in a lot of languages. Some languages only have 3 color words, or 4. And actually blue-green is kind of common. So these eggs would definitely be describable in most languages of the world. Fun stuff.

Super easy recipe coming up here...

Bleen (blue-green) Eggs

Ingredients (for one or two servings)
1/3 c of slightly thawed frozen blueberries
2 eggs
2 tbs of mashed banana
pinch of salt
1/4 tsp vanilla

Scramble eggs and mashed banana. Add remaining ingredients. Then cook in frying pan as you would any normal scrambled eggs. Woot woot! Done.

Enjoy!

Notes:
-as you can tell from the pictures, I put some blueberry jam on toast and enjoyed the combination.
-I might recommend a little sugar if you like it sweeter (that's why I had it with jam). I'm sure it'd be great with a little powdered sugar sprinkled on top!
-I thought these eggs were going to be green...like the Dr. Suess story. Pfft. Sillyness. If you're looking for a natural way to make green eggs to go with your ham (without adding food coloring) try adding just 1 or 2 blueberries...or pureeing them and adding a tsp!

Thursday, June 13, 2013

A God Story and Blueberry Cream Soda

I've decided that I'm going to record some things God's been teaching me with these recipes. Will it have anything to do with the recipes? Probably not. But that's what I'm doing. Because...why not?

So God kind of gave me a wake up call today. I was going to read the Bible, probably something in the New Testament. But I haven't completed the Old Testament that I started over a year ago.

I felt kind of bad about it. Then I started thinking about how fast I had read through the first 1/2 of the reading plan last year, and how excited I was. The goal of reading the whole Bible seemed...accomplishable for the first time in my life! And that's pretty sweet. 

However, I slowed down a lot this past semester of college and lost interest quite a bit in some of the Old Testament books. One that seemed to drag on in particular was Ezekiel. And really, it's not the least exciting book. It just felt...so...long....

Then I started thinking about how much Satan must not want us to read the Bible. Is it a requirement? No, it's not. But is it a good idea? Yes! Is it awesome? Yes! And from what I've heard of the devil...he's not a big fan of awesome, good ideas.

So of course he's going to be all over people who try to read through the Bible. Pfft. No wonder it's so hard sometimes.

Whenever I think of Satan using little tactics to deceive me, I get this weird...determination. I think to myself, "Oh, I see what you did there. You got me that time. But, ha. I figured you out. Me and Jesus (mainly Jesus), we're going to overcome your silly deceit. You can't fool Him. And I'm with Him."

By the way, I don't know how I feel about "taunting" the devil, but I've done it before. Basically I told him he had no power over me, so he could do his worst, which is completely true. But it ended up being one of the hardest days of my life. Out of it came my most embarrassing moment (it involved me looking like I peed my pants), and a few other difficult moments.

Anyway, I realized that Ezekiel's "dullness" was mostly created by me. I wasn't reading with a willing and thirsting heart. So I was thinking, "Stupid Caitlin. Who sparks interest in the Bible within me?" I knew the answer. I'm not the one who makes sweet revelations...He is. So He needs to help me out on this Bible-reading thing. (Duh.)

I prayed that He would give me interest, teaching me something new, and help me get through just one chapter of Ezekiel without being bored. So I read the chapter. Nothing special. 

Then I realized I only had 2 chapters left. So I decided one more couldn't hurt. There's a sign: it must've been interesting enough for me to continue. 

Continue I did. And I happened upon a Holy Spirit-given connection to one of my favorite analogies! In Ezekiel, I believe it makes reference to what Jesus later says to His disciples: they are fishers of men! It talks about fish and fruit and healing and nets. And I always thought Jesus was pulling that fishers of men thing out of thin air. Not so.

God is so cool.

No transition :)

Blueberry Cream Soda

ingredients for one serving:
1/3 c blueberries
2 tbs sugar
1/3 c water
1 tsp vanilla extract
6 oz chilled club soda

Puree blueberries in a blender or chop/mush them throughly. Make simple syrup by bringing water, sugar, and pureed blueberries to a boil. Let boil for 5 minutes. Take off heat, add vanilla, and let cool.

When syrup is cool, add to club soda with ice. Enjoy!

Tuesday, June 11, 2013

Chickpea dessert tamales!

I'm not going to make you wait for this recipe. You don't have time, because it's good and I think you might enjoy trying it.

I'll just say, I have plenty of "flops" when I make up my own recipes and food combos. But this one, NOT a flop. Just yummyness.
just a peanut butter-banana filled chickpea dessert tamale


Chickpea Dessert Tamale

Ingredients:
1 can chickpeas
3 tbsp oil (i used olive)
1/8 tsp bkg powder
1/2 c. sugar (I used white--this was plenty. Less could be used.)
1/4 c. oats

filling: Banana & peanut butter

Combine all (but filling) ingredients in a food processor and process until there are no chunks.
Spread the paste out on a cut sheet of foil*.

Add topping in the middle.
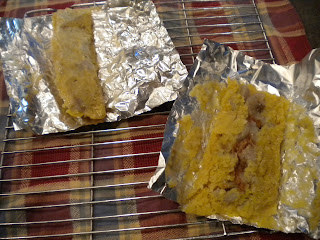
Wrap the foil around so the edges of the paste will cover the filling (or else you will get an equally delicious tamale, that looks a little sadder...such as the one on the right 2 photos down)

Steam for 20-30 minutes.
Unwrap to see the tasty creations!

Enjoy promptly. I prefer them warm!


Notes:
*I used foil because I did not have any corn husks or banana leaves on hand. I'm sure either of these would provide a more authentic tamale, and may add a good flavor.
-I think these would be delicious with many other fillings such as apples and cinnamon or some sort of chocolate. I will likely try other flavors in the future and will post to share how they turn out.
-This recipe should make about 8 good sized tamales at ~220 cal a piece (this includes the pb & banana)


Related Posts Plugin for WordPress, Blogger...